Build landing pages to promote webinars across different time zones
In a past life, I worked in the marketing department of a multi-national software company. Next to me worked a team responsible for scheduling and creating webinar series for our users.
Problem - Hardcoding time zones
A global audience meant promotional material needed regional localisation. This included localising the broadcast times of the webinars. The conversion and presentation of these times were all done manually. What's more, for languages like English that spanned locales including the US, UK & Australia, webinar broadcast times we presented together in a single block. The final result was a block of time zones and locations that were displayed to readers somewhat as follows:
Live Broadcast
8:00am United Kingdom (GMT)
5:00pm Australia - Sydney (+10:00 GMT)
3:00am United States - New York (-5:00 GMT)
In this tutorial, we're going to solve this information overload and present users with only a single time zone. We'll also give them the ability to switch different time zones. We'll also be generating all pages dynamically using a static site generator.
What we'll build
We're going to create a set of static landing pages to promote a three-part webinar series. The webinars are broadcast live from London. We'll be creating landing pages that show the times for the live broadcasts in Sydney, Auckland, London, New York and Los Angeles. We're going to keep things as simple as possible and try not to use any frameworks or libraries. Let's go!
If you want to jump straight to the good stuff, here's the TL;DR verions: Demo | Source
Solution
Part 1 - Setup
For this project, we'll be using Eleventy as our static site generator and Liquid as our templating language. Let's get started by creating a project folder and installing Eleventy using Node Package Manager.
mkdir timezone-webinars
cd timezone-webinars
npm install @11ty/eleventy --save-dev
With Eleventy installed, let's got ahead and create a simple folder structure to house the components of our project.
root
├───filters
└───src
    ├───_data
    └───_includes
        └───css
We're going to prepare some data that we'll use to populate our templates. We'll create two JSON data files & store them in the _data folder.
- Data for the three webinars in the series
- A list of time zones we'll be converting to
First, the webinars data file. We'll be storing a title, presenter, description, and broadcast time.
[
	{ "title": "Setting up your business", "presenter": "Fershad", "description": "Tips, tricks, and a few shortcuts to help you start your own business.", "liveTime": "2019-09-20T10:45:00Z" },
	{ "title": "Get your first client", "presenter": "Michael", "description": "Secure your first client, and start off on the road to success.", "liveTime": "2019-09-27T12:30:00Z" },
	{ "title": "Handling your taxes", "presenter": "Andrew", "description": "Stay on top of your finances and tax reporting to avoid unexpected suprises.", "liveTime": "2019-10-04T15:00:00Z" }
]
An important point to note regarding the liveTime field above. We are using ISO 8206 date and time format for the broadcasts time. This way, we can easily convert it later on while accounting for variables such as seasonal clock changes in some locales.
Now for the time zone data file.
[
	{ "location": "Pacific/Auckland", "locale": "en-NZ", "name": "Auckland (UTC+13:00)"},
	{ "location": "Australia/Sydney", "locale": "en-AU", "name": "Sydney (UTC+10:00)"},
	{ "location": "Europe/London", "locale": "en-GB", "name": "London (UTC+00:00)"},
	{ "location": "America/New_York", "locale": "en-US", "name": "New York (UTC-05:00)"},
	{ "location": "America/Los_Angeles", "locale": "en-US", "name": "Los Angeles (UTC-10:00)"}
]
You can get a full list of time zones, and locales here. Of course, you could also use other methods to store this data such as in an Airtable base or, for more complicated cases, in a Database-as-a-Service such as FaunaDB.
For completeness, let's create a .eleventy.js config file, and point it to our 'src' folder. Be sure to create/save this file in the root directory for your project. We'll also tell it to output our static files to a folder called 'dist'.
module.exports = function(eleventyConfig) {
    return {
        dir: {
            input: "src",
            output: "dist"
          }
    };
  };
With all the data ready, we can start to make the template file to create landing pages for our various time zones.
Part 2 - Templating
Let's start with a straightforward template to check everything is working as planned. From there, we can go about building it into something that looks more akin to what you'd want to send to someone.
We'll be using Shopify's Liquid as our templating engine. It's supported out of the box by Eleventy, and I've found it to be pretty good in the time I've been using it.
Our simple template is going to take the data from the timezones.json file, and create a page for each using the location to form the file path. Save this file in the src folder.
---
layout: base.liquid
pagination:
  data: timezones
  size: 1
  alias: zone
permalink: /{{ zone.location }}/index.html
---

<h1>{{ zone.name}}</h1>
<p>{{ zone.location }} | {{ zone.locale }}</p>
Let's also create a layout file for this template to use. You can see in the frontmatter of the zones.html file we've told Eleventy to look for a file called base.liquid to use for the layout. We'll create and store this file in the _includes folder.
<!DOCTYPE html>
<html lang="en">
<head>
    <meta charset="UTF-8">
    <meta name="viewport" content="width=device-width, initial-scale=1.0">
    <meta http-equiv="X-UA-Compatible" content="ie=edge">
    <title>Business Webinar Series</title>
</head>
<body>
    {{ content }}
</body>
</html>
Now if you run the eleventy command, you should see a new _site folder created. Within that should be individual folders for each of the time zones in our JSON file.
Next, let's bring in the date for the webinars into our template file and create a filter that handles the time zone conversions for us.
Part 3 - Time zone filter
First up, getting the data for each webinar into the template file for our time zones is pretty straightforward.
For now, let's loop of the webinar data and output it. We'll worry about layout and formatting later. Add the following to the zones.html file we created earlier.
{% for webinar in webinars %}
	<div>
		<h2>{{ webinar.title }}</h2>
		<p>{{ webinar.description }}</p>
		<p>{{ webinar.presenter }}</p>
		<p>{{ webinar.liveTime }}</p>
	</div>
{% endfor %}
Rerunning the eleventy command, and inspecting one of the pages generated should allow you to see the information from our webinars JSON file presented in HTML.
For converting the time zones, we'll use a custom filter. The filter takes the webinar liveTime data, and the time zone data, and output a localised time from that.
Eleventy allows you to configure and add custom filters, which can then be called in our templates. We're going to create one now in the .eleventy.js config file we created earlier.
module.exports = function(eleventyConfig) {

eleventyConfig.addFilter("addZone", require("./filters/zone.js") );

return {
....
}
  };
Next, let's create the javascript file itself with the filters folder we set up earlier.
module.exports = function(time, zone) {
    let locale = zone.locale || "en-US";
    let liveTime= new Date(time);
    let localeTime = liveTime.toLocaleString(locale, { timeZone: zone.location});
    return localeTime;
  }
We can now call this filter in our zones.html template. Note that we'll have to pass two arguments to this filter. If you need help with this take a look at this post. We've also used Liquid's date filter to format the date to give a little consistency to the output.
{% for webinar in webinars %}
	<div>
		<h2>{{ webinar.title }}</h2>
		<p>{{ webinar.description }}</p>
		<p>{{ webinar.presenter }}</p>
		<p>{{ webinar.liveTime | addZone: zone | date: "%A, %B %e, %Y @ %l:%M %p" }}</p>
	</div>
{% endfor %}
Now, if you run the eleventy command and inspect the output files, you should see a different webinar liveTime for each region.
This output can be formatted and presented however you like. In the next part, we're going to quickly add some additional layout and formatting components to make things look more appealing to our pretend webinar audience.
Part 4 - Formatting & Layout
Let's create a simple three-column layout for displaying the webinars. We'll make it go down to one column on mobile devices for completeness.
Start by making changes to our layout and template file.
<head>
...
<link rel="stylesheet" href="/_includes/styles/kanban.css">
</head>
<body>
<div class="container">
{{ content }}
</div>
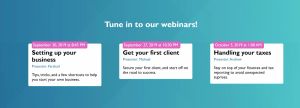
</body><h1>Tune in to our webinars!</h1>
<div class="holder">
{% for webinar in webinars %}
<div class="webinar">
<h2 class="title">{{ webinar.title }}</h2>
<p class="presenter">Presenter: {{ webinar.presenter }}</p>
<p class="description">{{ webinar.description }}</p>
<p class="time">{{ webinar.liveTime | addZone: zone | date: "%B %e, %Y at %l:%M %p" }}</p>
</div>
{% endfor %}
</div>Then we can style it with CSS. We'll create a file called 'styles.css' in the _includes/css folder of our project.
body, html {
  margin: 0;
	padding: 0;
	border: 0;
  width: 100vw;
  height: 100vh;
  font-family: 'Gill Sans', 'Gill Sans MT', Calibri, 'Trebuchet MS', sans-serif;
}

body {
  background: linear-gradient(45deg, rgba(152, 152, 152, 0.07) 0%, rgba(152, 152, 152, 0.07) 48%,rgba(136, 136, 136, 0.07) 48%, rgba(136, 136, 136, 0.07) 100%),linear-gradient(45deg, rgba(235, 235, 235, 0.06) 0%, rgba(235, 235, 235, 0.06) 79%,rgba(218, 218, 218, 0.06) 79%, rgba(218, 218, 218, 0.06) 100%),linear-gradient(135deg, rgba(12, 12, 12, 0.04) 0%, rgba(12, 12, 12, 0.04) 30%,rgba(79, 79, 79, 0.04) 30%, rgba(79, 79, 79, 0.04) 100%),linear-gradient(45deg, rgba(173, 173, 173, 0.03) 0%, rgba(173, 173, 173, 0.03) 66%,rgba(245, 245, 245, 0.03) 66%, rgba(245, 245, 245, 0.03) 100%),linear-gradient(135deg, rgba(84, 84, 84, 0.06) 0%, rgba(84, 84, 84, 0.06) 51%,rgba(165, 165, 165, 0.06) 51%, rgba(165, 165, 165, 0.06) 100%),linear-gradient(45deg, rgba(15, 15, 15, 0.02) 0%, rgba(15, 15, 15, 0.02) 14%,rgba(95, 95, 95, 0.02) 14%, rgba(95, 95, 95, 0.02) 100%),linear-gradient(0deg, rgba(34, 34, 34, 0.05) 0%, rgba(34, 34, 34, 0.05) 58%,rgba(98, 98, 98, 0.05) 58%, rgba(98, 98, 98, 0.05) 100%),linear-gradient(90deg, rgb(2, 110, 165),rgb(50, 216, 218));
}

.container {
    width: 100%;
    height: 100%;
    max-width: 1280px;
    padding: 0 0.5rem;
    margin: 0 auto;
    box-sizing: border-box;
    display: flex;
    flex-direction: column;
    justify-content: center;
  }

  .container > h1 {
      text-align: center;
      color: #fff;
  }

  .holder {
      width: 100%;
      padding: 1.2rem;
  }


.webinar {
width: 100%;
  max-width: 320px;
  margin: 1rem auto;
  height: fit-content;
  background: #FFFFFF;
  border-radius: 5px;
  position: relative;
  padding: 0 0.8rem;
  box-sizing: border-box;
  border: 1px #FFFFFF solid;
}

.webinar > .time {
    margin: 0;
    top: -10px;
    position: absolute;
    background: #DF64BE;
    padding: 5px 10px 5px 5px;
    border-radius: 5px;
    color: #FFFFFF;
  }

  .webinar > .title {
      margin-bottom: 0.25rem;
  }

  .webinar > .presenter {
      margin-top: 0.25rem;
      color: #27749A;
      font-size: 90%;
  }

  @media screen and (min-width: 640px) {
    .holder {
      display: grid;
      grid-gap: 1rem;
      grid-template-columns: repeat(auto-fit, 380px);
      justify-content: center;
    }
  }
The final thing we'll have to do is to tell Eleventy to copy this CSS file directly to our output folder. Our final config file should look like this:
module.exports = function(eleventyConfig) {

    eleventyConfig.addFilter("addZone", require("./filters/zone.js") );
    eleventyConfig.addPassthroughCopy("/_includes/css");

    return {
        dir: {
            input: "src",
            output: "dist"
          },
        addPassthroughCopy: true
    };
  };
Extra
As an extra, let's quickly create a simple index page with links to all the pages we created earlier. We'll loop through the array of time zones we created earlier, and link to each page. We can do this because we set the permalink for each webinar page to be the time zone location.
---
layout: base.liquid
---
<div class="prose container">
  <h1 class="h1">Select a time zone.</h1>
  <ul class="links">
  {% for zone in timezones %}
    <li><a href="/{{ zone.location }}">{{ zone.location }}</a></li>
  {% endfor %}
  </ul>
</div>
Take a look at what the final pages look like, and view the source code on Github. Of course, this is just a starting point. We haven't even begun to tackle topics such as localised text and location-based routing. Maybe I'll get to those in later posts.